If your application has a broad reach of users, it’s likely you will face one of this:
- The new release works, but it breaks some feature from the previous release.
- The feature works correctly on this model, but not that model.
- The designed UI doesn’t work as well in landscape mode
While unit testing can help you to catch much coding & logical error in your application, it doesn’t help you to do UI (and integration) testing.
Most likely you just tested out the feature by yourself, using your own phone while you developed it. It was not tested on other form factors. As the application complexity increased, you never retested the old feature again.
Xamarin.UITest
Xamarin.UITest is a UI test framework developed by Xamarin. It can simulate user interactions on Xamarin application (Forms, iOS, Android), and also native swift/Obj-C based iOS & Java-based Android application. It’s API that powers Xamarin Test Cloud, enabling an uploaded test to run on hundreds of physical device simultaneously.
However, you can also run the same test on your dev machine, using an emulator or connected device.
Today, we’re going to focus on testing a simple Xamarin.Forms Android application using Xamarin.UITest APIs.
Prerequisites
The following are all done using: VS2017 v15.9, Xamarin 4.12.3.69, Xamarin.UITest 2.2.7, Google Emulator
Make sure of the following before we start:
ANDROID_HOMEsystem variable is pointing to the Android SDK’s installation directory. Recommended to be the same as VS’s settings.JDK_HOMEsystem variable is pointing to the Java Development Kit’s installation directory. Recommended to be the same as VS’s settings.
If Xamarin.UITest emit mismatched SDK version between dev machine & emulator, you might want to make sure that “platform-tools.old-xxxxx” doesn’t exist in the Android SDK folder.
1. Setting up Xamarin.Forms
Download the sample project from my github repo
In our XF application, we have
- a text field
- a button that validates the length of the text field input (Less than 5 characters, display ‘Wrong’; Else, display ‘Correct’)
- a series of coloured boxes
- a label that displays how far along that we have scrolled.
In each of the item that we wish to automate, we should assign a unique name to its AutomationId attribute. We will use this in our test script later.
<script src="https://gist.github.com/xyfoo/a0b3c0fc6673060ef6abb4c0e6ddd0e2.js">2. Create new Xamarin.UITest project
Add new project > Visual C# > Test > Xamarin.UI Cross-Platform Test Project
Xamarin.UITest project requires NUnit 2.6.3 or 2.6.4 to manage & run the test, and is incompatible with NUnit 3.
3. Initialize application for test
StartApp function in AppInitializer.cs is where the test environment is configured. This function will be called during the test setup, in order to provide a clean test environment for tests to run.
Here we’re asking the initializer to do the following:
- Specified an installed application on the device (or you can supply an APK file)
- Enable on-demand screenshot capture as specified in the tests
- Decide automatically if the test should run on the emulator or connected device
- Start the application
Initialization in the iOS application is different from the Android application. You can read more @ iOS, Android
4. Writing our test
To test if the text field validation works, we need to do the following:
- Enter 4 characters into the text field
- Tap the validate button
- Check if the message box contains our expected output
- Take a screenshot so we can review the result manually later
We can use Marked attribute or AppQuery to locate for the UI element to act on. In Xamarin.Forms, Marked attribute is represented by the AutomationId in Xamarin.Forms that we’ve inserted into XAML earlier.
So one would write the test as below:
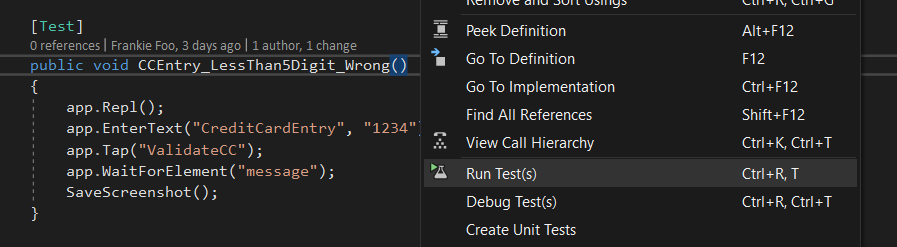
<script src="https://gist.github.com/xyfoo/f45b66550198a3cee5c2c1ac3410b033.js">5. Run the test
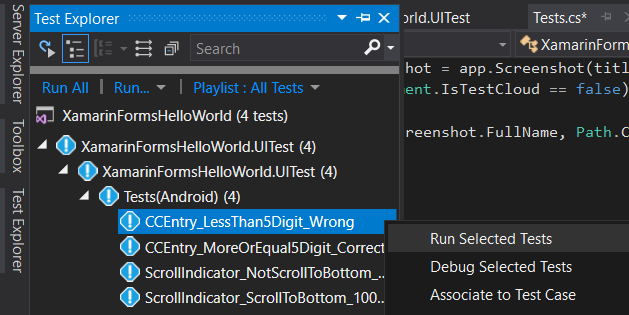
Right-click on your test, and select ‘Run Test’, or you can select the test in the Test Explorer.
 {:class="blogimg"}
 {:class="blogimg"}
6. The test will failed
If you run the test above, the test result will indicate failure. But when we check the screenshot, it will show that the test has in fact performed as expected. So what went wrong?
The main reason is that UI rendering operation is much slower than our test sequence and that rendering time may depend on many external factors, such as network performance, code execution speed, hardware limitation etc. So when we check for the error message, we will encounter error, as the message box has not been rendered yet, and hence the test will fail.
So we should introduce some delay before checking for result, and we can do this by using WaitForElement API.
<script src="https://gist.github.com/xyfoo/6570b39ef9ed522527eefd49bf42fa39.js">So there you have it, you have written your first Xamarin.UITest automated test.
As exercise, you may try to write a test to test out the scrolling behaviour as an exercise.